 Save to Pins
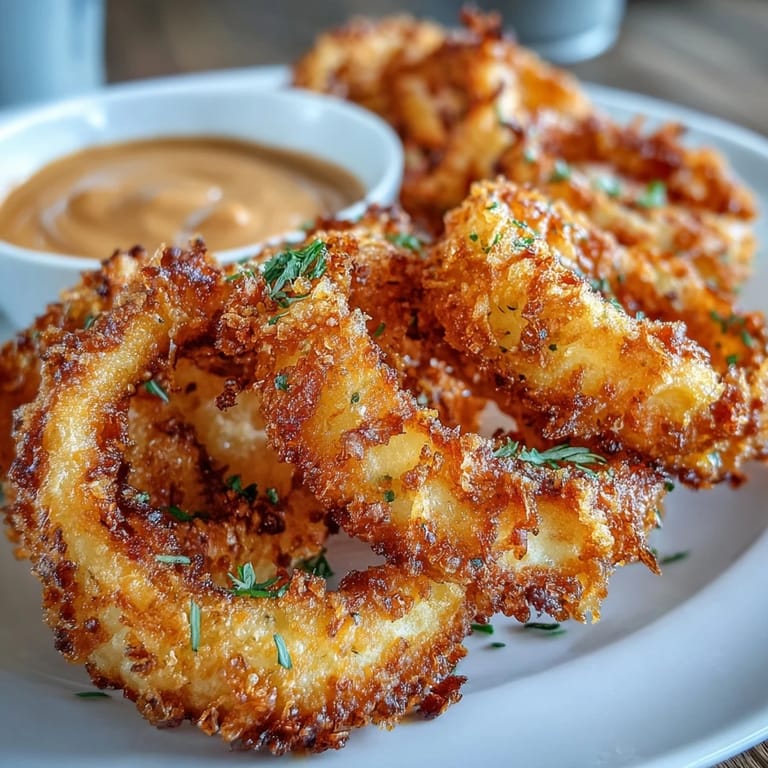
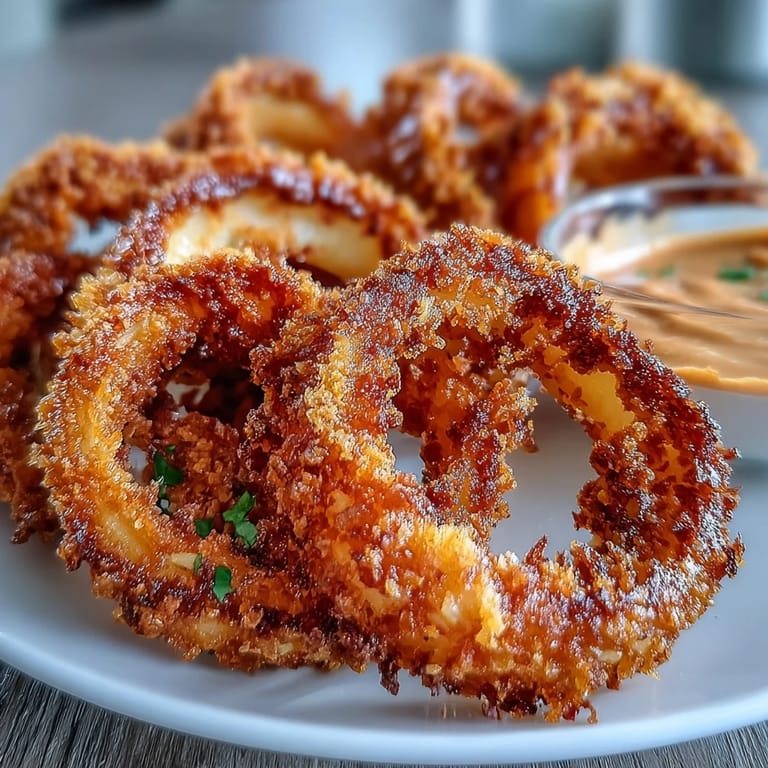
 My cousin brought these baked onion rings to a backyard gathering last summer, and I watched people reach for them again and again, completely skeptical that they were oven-baked. The golden, crispy exterior crackled between teeth, nothing like the greasy diner version I'd resigned myself to enjoying occasionally. When she handed me the container of smoky paprika dip, I understood immediately why everyone was hovering around the appetizer table instead of the grill. That one afternoon shifted something in my kitchen—I stopped thinking of crispy snacks as something only a deep fryer could deliver.
I made these for a work potluck on a Tuesday afternoon when I was running behind, and I brought them straight from my oven into a container. A colleague who'd worked as a line cook in restaurants took one bite and paused mid-chew, then asked where I'd gotten them from. When I told her I'd baked them, she looked genuinely betrayed that I hadn't mentioned this possibility before. That moment felt small at the time, but it stayed with me—proof that good food matters more than the method.
What's for Dinner Tonight? 🤔
Stop stressing. Get 10 fast recipes that actually work on busy nights.
Free. No spam. Just easy meals.
Ingredients
- Yellow onions: Large ones give you substantial rings that hold their shape beautifully; smaller onions will collapse during baking and become mushy.
- All-purpose flour: This creates the first sticky layer that helps the egg mixture cling properly to each ring.
- Eggs and milk: Together they form a custard-like batter that adheres better than egg alone and creates a tender coating underneath the crunch.
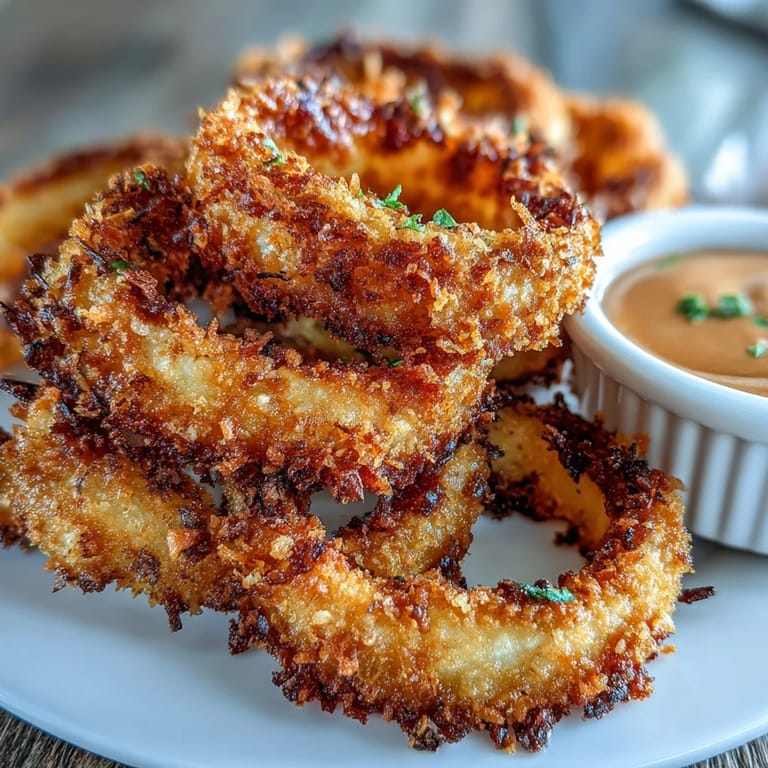
- Panko breadcrumbs: These are coarser than regular breadcrumbs and deliver that satisfying shatter when you bite through them.
- Smoked paprika: It adds depth and color without overpowering; use the real stuff, not the sweet kind that tastes like ketchup.
- Sour cream and mayonnaise: The combination creates a dip with body; mayo adds richness, sour cream keeps it bright.
- Cooking spray: A light coat replaces the traditional deep fryer and lets the oven do the crisping work.
Instructions
- Heat your oven and prep your stage:
- Set the temperature to 425°F and line your baking sheet with parchment paper or a silicone mat—this prevents sticking and makes cleanup feel like less of a chore. Having everything ready before you start prevents that frantic moment of wet onion rings looking for a home.
- Slice and separate your onions:
- Cut them into half-inch rings and gently separate the layers with your fingers; some will break apart and that's fine—toss those straight into a snack bowl for yourself. The goal is rings substantial enough to hold their coating without becoming translucent.
- Set up your three-bowl assembly line:
- Bowl one gets flour mixed with salt and pepper, bowl two becomes whisked eggs and milk, and bowl three holds panko breadcrumbs stirred together with garlic powder and smoked paprika. This setup prevents chaos and ensures every ring gets an even journey through the coating stations.
- Coat each ring with intention:
- Flour first, then egg bath, then breadcrumb mixture—press gently as you coat so the crumbs actually stick rather than slide off into a pile. Double-dipping in egg and breadcrumbs creates an extra-shatteringly crisp texture if you have patience.
- Arrange on your sheet and spray:
- Lay the rings in a single layer and give them a light spritz of cooking spray on top; this is what creates the golden, crispy exterior that feels fried. Don't drench them or you'll end up with soggy bottoms.
- Bake until they're gorgeously golden:
- Set a timer for 18 to 20 minutes and flip halfway through so both sides brown evenly. They should look like they came from a restaurant kitchen, not pale and sad.
- Make your dip while they bake:
- Combine sour cream, mayonnaise, smoked paprika, garlic powder, and lemon juice in a small bowl, then taste and adjust salt and pepper. Lemon juice is the secret that keeps the dip bright instead of heavy.
- Serve hot with confidence:
- Transfer the onion rings to a plate immediately so they stay crisp, and place the dip alongside in a small bowl. They're best eaten within a few minutes while they still have that perfect textural contrast.
 Save to Pins
 My partner, who claims to dislike cooked onions, ate four of these in a row without commenting, which is the highest form of praise in our household. Later, they admitted the caramelization and crispy exterior changed their mind about onions entirely—a small kitchen victory that led to onion rings becoming a regular request.
The Art of the Perfect Crisp
Temperature is everything in this recipe; if your oven is running cool, those rings will bake through before they crisp, leaving you with tender onions in a soft coating instead of the textural magic you're after. I learned this by testing at 400°F and ending up with rings that needed another ten minutes just to start browning. Getting an oven thermometer changed everything for me—suddenly recipes stopped being mysteries and became predictable, reproducible victories.
The Dip Game
The smoky paprika dip is where this recipe transcends simple appetizer and becomes something people request by name. The smoke flavor should be noticeable but not overwhelming; think of it as a suggestion rather than a shout. I once made the dip with regular paprika and no one touched it, but switching to smoked made the exact same onion rings suddenly irresistible.
Storage and Serving Wisdom
These rings are best eaten immediately, but leftover dip keeps beautifully in the refrigerator for three or four days, making future snack preparations easier. Reheated rings lose their crisp, though you can revive them briefly in a 350°F oven for five minutes if you must. The onions themselves store best in an airtight container in the fridge for up to two days, though they really shine when freshly made.
- Make the dip ahead of time so you can focus on the timing of the rings without stress.
- If your onions are particularly large, cut them thinner than half an inch so they bake through completely.
- Keep parchment paper on hand because cleanup is the difference between making these regularly and making them occasionally.
 Save to Pins
 These onion rings proved to me that baking can deliver the satisfaction of frying without the mess or guilt, and that a simple smoky dip can elevate humble ingredients into something memorable. They're now my go-to when I want to feel like I'm cooking at a restaurant level without the complicated techniques.
Frequently Asked Questions
- → How do I achieve crispy onion rings without frying?
Coating onion rings with flour, egg wash, and panko breadcrumbs, then baking at a high temperature ensures a crispy texture without the need for frying.
- → What gives the dip its smoky flavor?
The dip's smoky flavor comes from smoked paprika combined with garlic powder and lemon juice, adding depth and a slight tanginess.
- → Can I substitute sour cream in the dip?
Yes, Greek yogurt can be used as a lighter substitute for sour cream in the dip, maintaining creaminess with a tangy twist.
- → Should I double-dip the onion rings for extra crunch?
Double-dipping the onion rings in egg and breadcrumbs before baking will enhance their crunchiness and create a thicker crust.
- → What temperature and time are best for baking these onion rings?
Bake the onion rings at 425°F (220°C) for about 18-20 minutes, flipping halfway to ensure even browning and crispness.