 Save to Pins
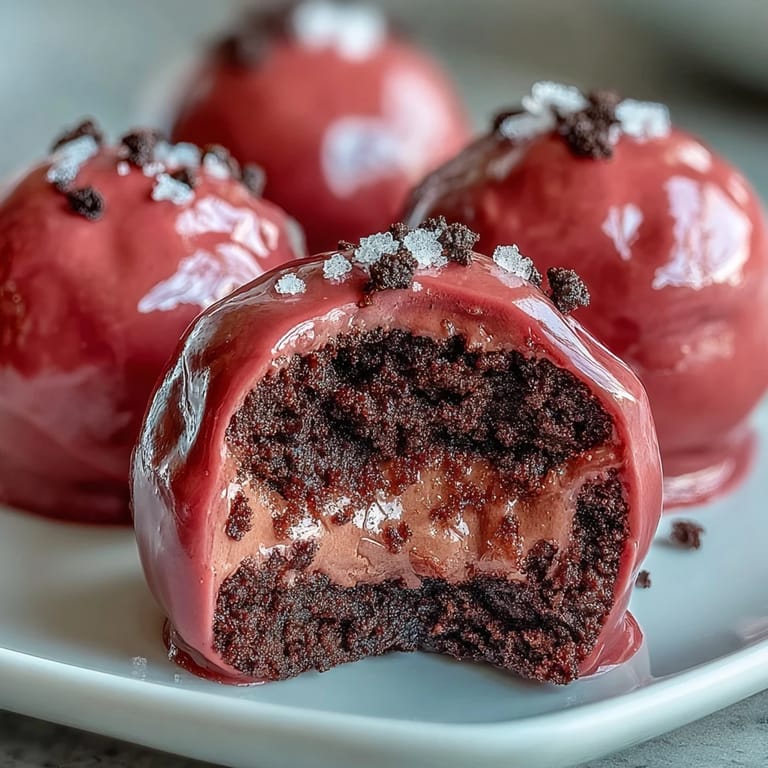
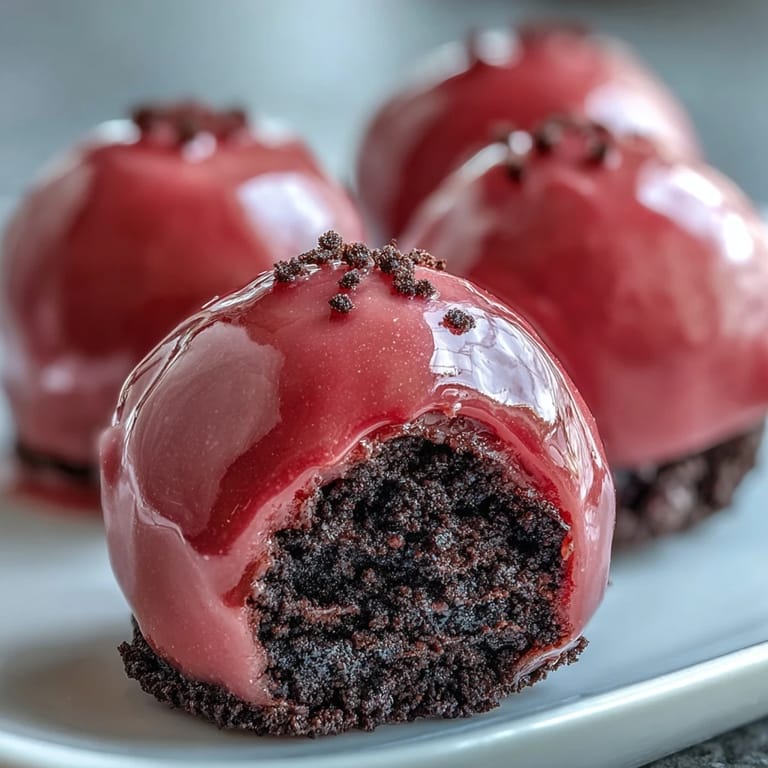
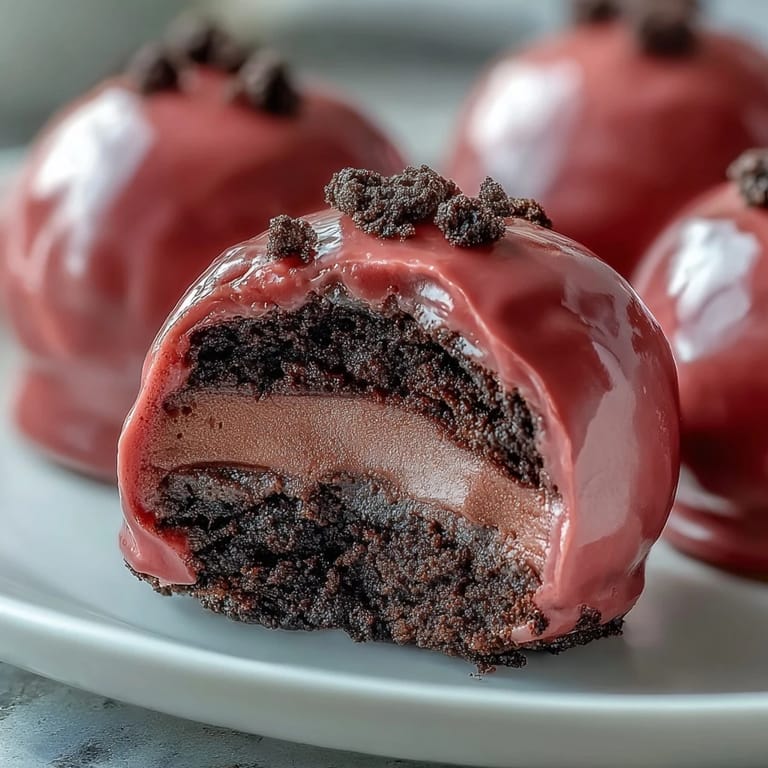
 My neighbor once brought these to a block party, and I watched kids and adults alike hover around the platter like bees to honey. The moment I bit through that crisp pink shell and felt the soft Oreo filling collapse on my tongue, I knew I had to recreate them. She wouldn't give me the recipe that day, so I went home and experimented until I got it right. Now, these little spheres show up at every celebration I host, and guests always ask if I bought them from a bakery.
I made my first batch for my daughter's eighth birthday, and she insisted on helping me roll every single ball. Her hands were sticky with cream cheese, and we laughed as she tried to shape them into perfect spheres while sneaking bites of the mixture. When her friends saw the pink-coated truffles on the dessert table, they squealed with delight. That sound, that pure joy over something so simple, reminded me why I love baking for the people I care about.
What's for Dinner Tonight? 🤔
Stop stressing. Get 10 fast recipes that actually work on busy nights.
Free. No spam. Just easy meals.
Ingredients
- Oreo cookies: Use the whole cookie, filling and all, because that's where the signature flavor lives, and crushing them into fine crumbs ensures a smooth, cohesive truffle base.
- Cream cheese: Let it sit at room temperature for at least an hour so it blends effortlessly with the crumbs without clumping or leaving streaks.
- Pink candy melts: These set firm and glossy at room temperature, and if you can't find pink, white melts tinted with oil-based coloring work just as beautifully.
- Vegetable shortening: A tiny spoonful thinned into the melted candy creates a silkier coating that glides over each truffle and hardens with a professional sheen.
- Sprinkles or edible pearls: Optional but delightful, these add a playful shimmer and give you a chance to customize the truffles for any occasion.
Instructions
- Crush the cookies:
- Pulse the Oreos in a food processor until they transform into dark, fragrant crumbs that look like cocoa powder. If you don't have a processor, seal them in a zip-top bag and roll over them with a pin until no large chunks remain.
- Combine with cream cheese:
- Scrape the crumbs into a bowl, add the softened cream cheese, and stir with a spatula until the mixture becomes one uniform, dough-like mass. You'll know it's ready when you can't see any white streaks and the texture is smooth and pliable.
- Shape the truffles:
- Scoop out tablespoon-sized portions and roll them between your palms, applying gentle pressure to form tight, round balls. Line them up on a parchment-covered baking sheet as you go, spacing them so they don't touch.
- Chill until firm:
- Slide the tray into the refrigerator for 30 minutes, or the freezer for 15, until the truffles feel solid and hold their shape when you pick them up. This step is crucial because soft truffles will fall apart when dipped.
- Melt the candy coating:
- Microwave the pink candy melts in a bowl at medium power, stirring every 30 seconds, until the mixture is completely smooth and glossy. Stir in the vegetable shortening if you want an even thinner, shinier coating that drapes beautifully.
- Dip each truffle:
- Use a fork to lower one chilled ball into the melted candy, roll it gently to coat all sides, then lift it out and tap the fork against the bowl's edge to let excess coating drip off. Set it back on the parchment and repeat with the rest.
- Add decorations:
- While the pink shell is still wet and tacky, sprinkle on your chosen decorations so they stick in place. Work quickly, because the candy sets fast once it starts to cool.
- Let the coating set:
- Leave the truffles at room temperature until the candy hardens into a firm shell, or speed up the process by chilling them in the fridge for 10 to 15 minutes. Once set, they're ready to serve or store.
- Store and serve:
- Keep the finished truffles in an airtight container in the refrigerator, where they'll stay fresh and delicious for up to a week. Serve them chilled for the best texture contrast between the shell and the center.
 Save to Pins
 One winter evening, I made a double batch of these for a cookie exchange, and my friend who's usually skeptical of homemade sweets ate three in a row without saying a word. When she finally looked up, she asked if I'd consider making them for her wedding shower. That quiet compliment, delivered between bites, meant more to me than any flowery praise ever could.
Choosing Your Candy Coating
Candy melts come in nearly every color you can imagine, and swapping pink for red, blue, or pastel green lets you match the truffles to any party theme or season. I've used white melts tinted with oil-based food coloring when I couldn't find the exact shade I wanted, and the results were just as vibrant and glossy. If you prefer a richer flavor, you can use tempered chocolate instead, though it requires more precision and a slightly different technique. The choice between candy melts and chocolate comes down to convenience versus depth of flavor, and both deliver beautiful, professional-looking truffles.
Texture Variations
The classic recipe is smooth and creamy, but I've stirred in finely chopped toasted pecans for a subtle crunch that plays beautifully against the soft center. Shredded coconut is another favorite addition, lending a hint of tropical sweetness and a delicate chew. If you want to experiment, try swapping regular Oreos for mint, peanut butter, or birthday cake varieties to create entirely new flavor profiles. Each variation keeps the same foolproof method, so you can customize without worrying about the technique.
Presentation Ideas
I like to arrange these truffles in mini cupcake liners and stack them in a tiered display, which makes them look like they came from a fancy candy shop. For gifts, I tuck them into clear cellophane bags tied with ribbon, and the pink shells catch the light in the most charming way. You can also drizzle contrasting colored candy melts over the set coating for an artistic touch that takes seconds but looks like you spent hours decorating.
- Nestle each truffle in a paper liner to prevent fingerprints and make serving easier at parties.
- Use a toothpick to create swirl patterns in the wet coating before it sets for a marbled effect.
- Store them in a single layer to keep the decorations intact and the coating smooth.
 Save to Pins
 These truffles have become my go-to when I want to share something sweet without spending the whole day in the kitchen. Every time I pull a tray from the fridge and see those glossy pink spheres lined up like little edible jewels, I feel a quiet pride that never gets old.
Frequently Asked Questions
- → Can I use a different color for the candy coating?
Absolutely! You can use any color candy melts or tint white candy melts with oil-based food coloring to match your party theme or holiday. The pink coating can be swapped for red, blue, green, or any color you prefer.
- → How long do these truffle balls stay fresh?
When stored in an airtight container in the refrigerator, these truffle balls will stay fresh for up to 1 week. Keep them chilled for the best texture and flavor.
- → Do I need a food processor to make these?
No, a food processor is helpful but not required. You can easily crush the Oreo cookies by placing them in a sealed zip-top bag and crushing them with a rolling pin until fine crumbs form.
- → Why add vegetable shortening to the candy melts?
Adding a teaspoon of vegetable shortening to the melted candy coating creates a smoother, shinier finish and makes the coating easier to work with. However, it's completely optional and the truffles will still turn out delicious without it.
- → Can I freeze these truffle balls?
Yes, these truffle balls freeze well. Store them in an airtight container with parchment paper between layers for up to 2 months. Thaw in the refrigerator before serving for the best texture.
- → What's the best way to dip the truffles without making a mess?
Make sure your truffle balls are well-chilled before dipping. Use a dipping fork or regular fork to lower each ball into the melted candy, then gently tap the fork on the edge of the bowl to remove excess coating. This prevents pooling and creates a smooth finish.