 Save to Pins
 When the weather starts hinting at spring, I usually spot bunches of fresh scallions at the market—sometimes with a bit of soil still clinging to the roots. The first time I attempted spring onion pancakes, there was jazz playing in the background and my kitchen windows flung wide open, letting in a mix of city sounds and sharp green scents. I wasn’t sure my frying technique would pan out, but the sizzle when dough met oil was instantly reassuring. The result: flaky, crispy pancakes that disappeared faster than I’d expected. These days, I make them whenever I want something comforting that isn’t too fussy but feels like a treat.
Last summer, a friend dropped by unexpectedly, catching me mid-flour-dusted prep for these pancakes. We laughed at my flour-speckled face, and I set her to work slicing more scallions while we talked. She admitted she’d only ever eaten the takeout version, but swore mine tasted far crisper and fresher. Her youngest circled hungrily, enthralled by the pancake spiral unraveling on the plate. That batch never even made it to the dinner table—the wedges vanished as soon as I set them down.
What's for Dinner Tonight? 🤔
Stop stressing. Get 10 fast recipes that actually work on busy nights.
Free. No spam. Just easy meals.
Ingredients
- All-purpose flour: For the ideal chewy yet tender dough, I use unbleached flour and always sift it first for an even texture.
- Boiling water: This trick hydrates the flour and gives the dough a supple bite—pour slowly and mix quickly to avoid lumps.
- Cold water: Adding this at the end helps the dough relax, making it easier to knead and roll.
- Salt: A little in both dough and filling keeps flavors lively—don’t skip or skimp here.
- Spring onions (scallions): I slice from both green and white parts for layers of sharp, sweet flavor.
- White pepper (optional): For subtle warmth, I add a pinch—it’s not traditional, but I love the backnote.
- Vegetable oil: Brushing between layers and frying adds flakiness and gets those irresistible crisp edges.
Instructions
- Make the dough:
- Combine flour and salt in a big bowl, then pour in boiling water—it’ll hiss and puff a cloud. Stir until messy clumps form, add cold water, then knead on your counter for about five minutes until smooth before letting it rest under a damp cloth.
- Divide and shape:
- Cut the dough into four pieces and roll each into a soft ball, feeling for that perfect plush heft.
- Roll and fill:
- Dust your surface and roll a ball into a thin rectangle, brush gently with oil, sprinkle salt and green onions, then breathe in that grassy aroma as the filling hits the dough.
- Spiral up:
- Roll the sheet up longways, then coil it like a snail shell, tucking the end in under—repeat until all are coiled up and ready for flattening.
- Flatten and fry:
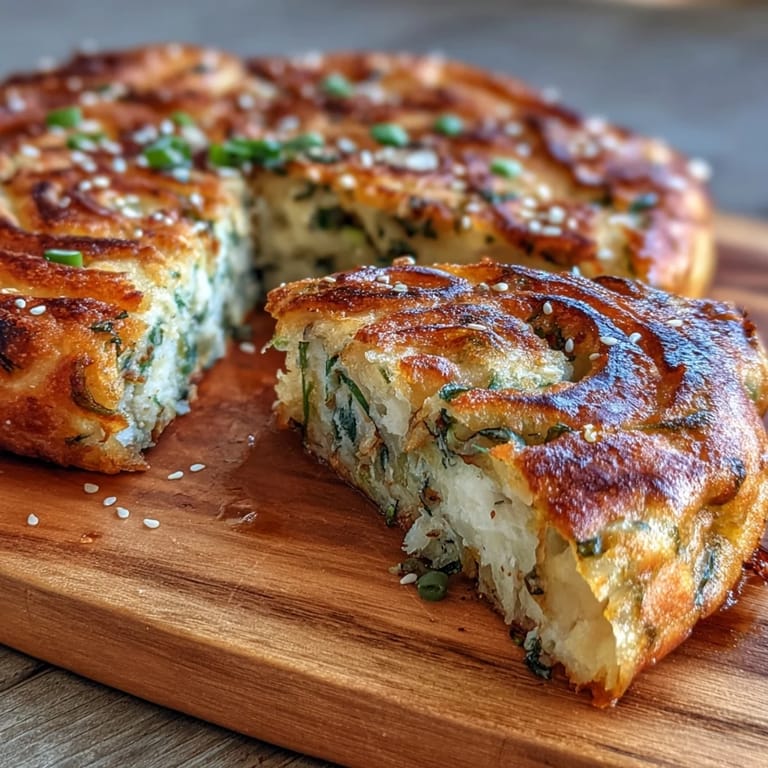
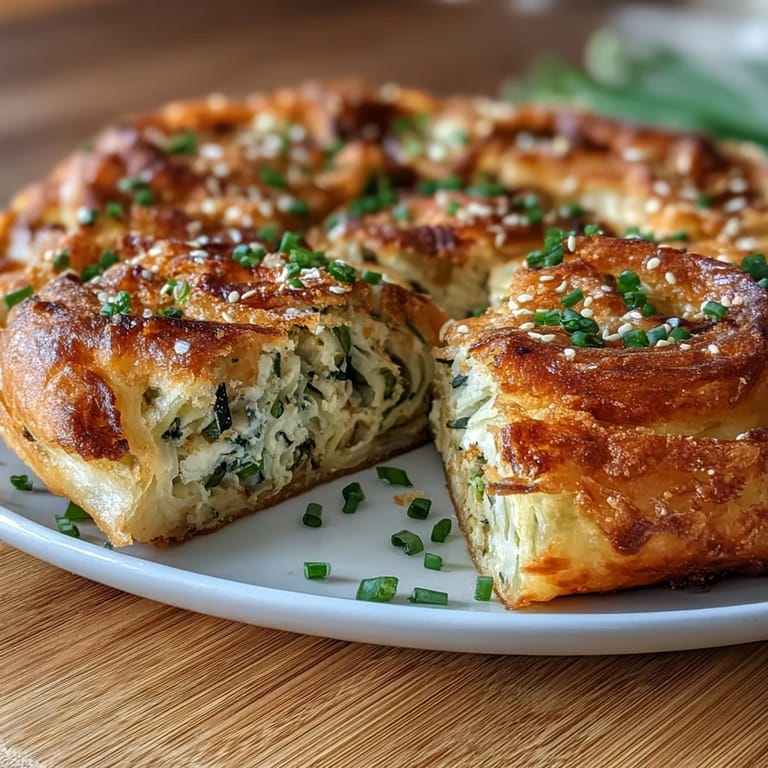
- Roll each spiral into a disc (about 6 inches across), then heat oil in a skillet and fry each pancake, letting them bubble away until both sides are deep golden and crisp, about two or three minutes per side.
- Drain, cut, and serve:
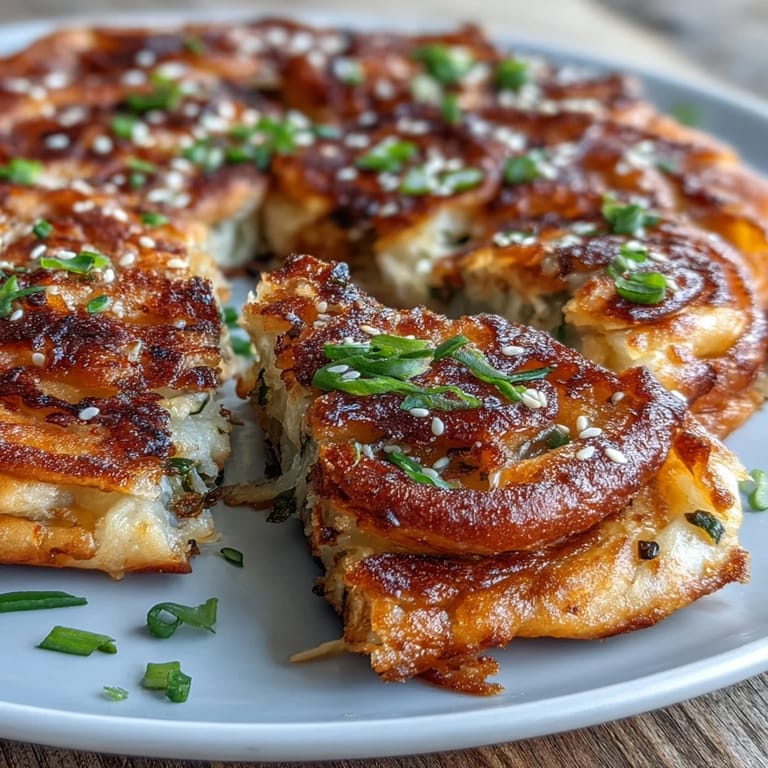
- Rest the fried pancakes on paper towels, slice into wedges, and serve warm—don’t be surprised if eager hands swipe pieces as soon as you finish cutting!
 Save to Pins
 A chilly evening once had me making these pancakes solo, the only company a cup of tea and an audiobook. As I listened, hands moving almost on autopilot, the ritual of making each spiral slow and steady, I found the process soothing in itself—by the time the last pancake had cooled, it felt like the kitchen and I had made peace with the day.
Serving Up Street Market Magic at Home
What surprised me the most was how much these pancakes capture the essence of a bustling night market—even at my quiet kitchen table. The crackle of dough in the pan and the aroma of scallions always remind me you don’t need to travel far for a little bit of culinary adventure.
Beyond Just Scallions
Some days, I’ll play with the filling—finely chopped garlic or a few sesame seeds, even a scattering of chives for added depth. The base dough welcomes new flavors, as long as you don’t overstuff, so don’t be afraid to invent your own twist next time.
Little Secrets for Extra Crunch
If you want maximum flakiness, brush each layer of dough with a touch more oil—don’t be shy, that’s the secret street vendors use. Let each pancake have enough space in the skillet to brown evenly, and remember, patience is rewarded with the crispiest texture.
- Press gently as you roll, so you don’t squeeze out all the layers.
- Keep the heat at medium to prevent burning before the inside is fully cooked.
- Slice and serve while hot—the magic fades as they cool.
 Save to Pins
 Whether made for a friend or devoured solo, these pancakes are a crunchy, savory reward just waiting for you. Happy rolling, frying, and feasting!
Frequently Asked Questions
- → How does hot water affect the dough?
Using boiling water partially cooks the flour, creating a more pliable dough that’s easier to roll thin and gives a tender, layered texture after frying.
- → How long should the dough rest?
Resting about 20 minutes relaxes the gluten, making the dough easier to roll thin and helping layers form without springing back.
- → What oil is best for frying and layering?
A neutral oil such as vegetable or canola works well for frying and brushing between layers; it promotes crispness without overpowering the scallion flavor.
- → How thin should each pancake be rolled?
Roll each disc to roughly 1/8 inch (about 3 mm). Thin layers yield flakier results and allow the exterior to crisp while the interior stays tender.
- → Can these be made ahead or frozen?
Yes. Cooked pancakes reheat nicely in a skillet to restore crispness. You can also freeze shaped, uncooked coils or cooked pancakes; thaw and pan-fry or reheat from frozen with a bit of oil.
- → Any easy variations to the filling?
Try adding toasted sesame seeds, minced garlic, or a pinch of white pepper to the scallions. For a heartier bite, fold in fine chopped cabbage or grated cheese before rolling.