 Save to Pins
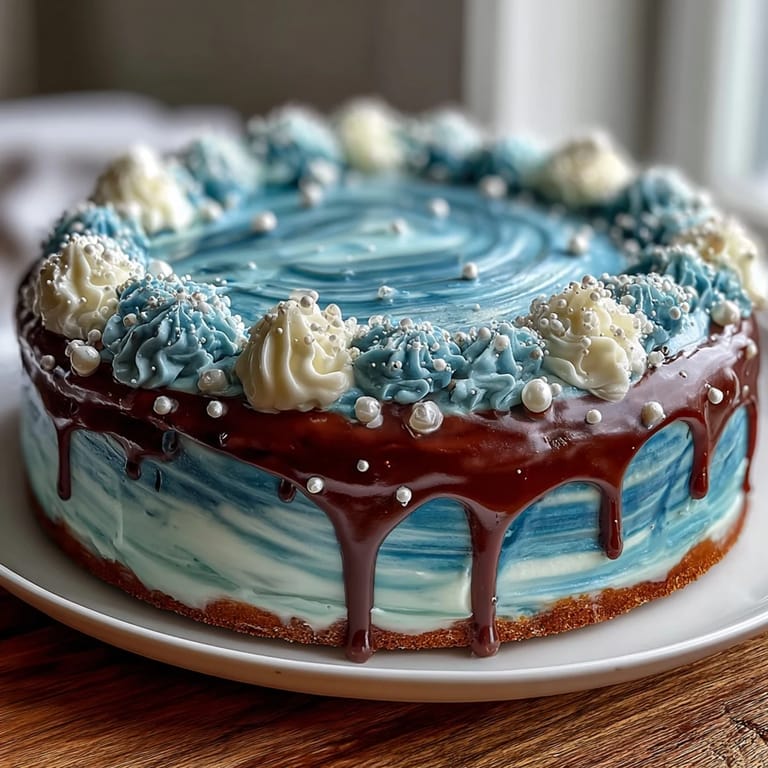
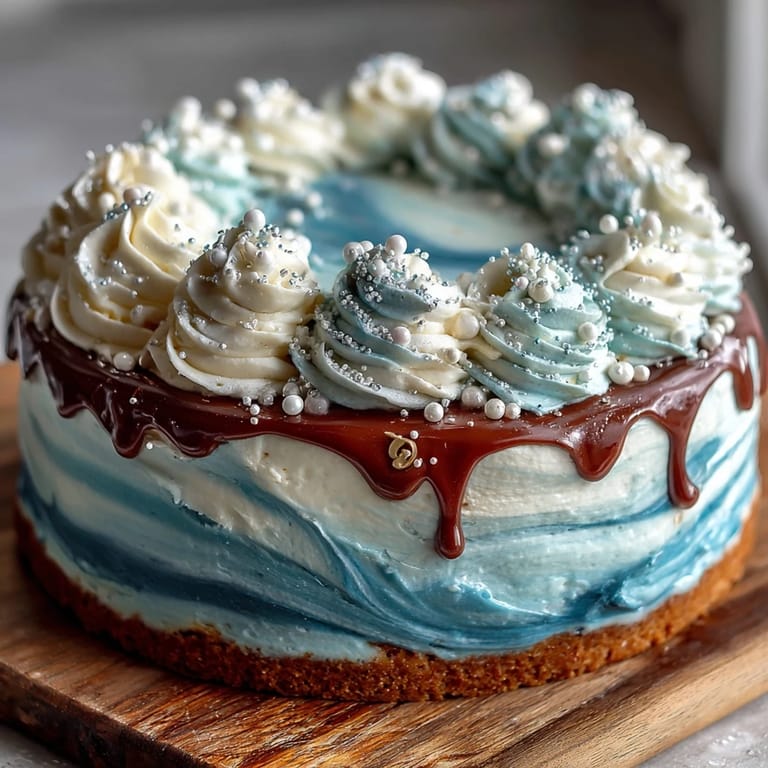
 My friend texted me a photo of her Pisces zodiac necklace one afternoon, and I found myself daydreaming about what her birthday cake should look like—something that captured the dreamy, fluid energy of water itself. I'd made plenty of sheet cakes before, but never one that felt like edible art, so I decided to try my hand at ocean waves in buttercream. The first attempt was clumsy, all lumps and confusion, but by the third time I piped those frosting waves, something clicked, and suddenly I had a cake that looked like it belonged in a coastal villa.
I'll never forget watching my friend's face light up when she saw this cake at her party last spring—not because it was perfect, but because she felt seen in it. Her sister whispered to me that she'd never had anyone put this much creativity into her birthday, and that small moment made me understand why people bake for the people they love. It wasn't about technique; it was about saying 'I know you, and I made something that speaks your language.'
What's for Dinner Tonight? 🤔
Stop stressing. Get 10 fast recipes that actually work on busy nights.
Free. No spam. Just easy meals.
Ingredients
- All-purpose flour (2 ½ cups): This is your foundation—make sure it's fresh and not compacted, or your cake will be dense instead of tender.
- Baking powder (2 ½ tsp): Don't skip this or reduce it; it's what gives the sponge its light, airy crumb that keeps people coming back for seconds.
- Salt (½ tsp): A tiny pinch that you won't taste but will absolutely enhance the sweetness of the cake.
- Unsalted butter (1 cup plus 1 ½ cups): Room temperature is non-negotiable here—cold butter won't cream properly and you'll end up with a dense cake instead of fluffy.
- Granulated sugar (1 ¾ cups): The beating step matters more than you'd think; three minutes of creaming creates tiny air pockets that make the cake rise beautifully.
- Large eggs (4): Bring them to room temperature so they blend smoothly into the batter without creating lumps.
- Pure vanilla extract (1 tbsp plus 2 tsp): The real stuff makes a difference—extract with vanillin will taste slightly artificial by comparison.
- Whole milk (1 cup plus ¼ cup): Room temperature milk incorporates more evenly and doesn't shock the batter.
- Powdered sugar (5 cups): Always sift this before using, or your frosting will be grainy no matter how much you beat it.
- Blue gel food coloring: Gel beats liquid because it won't thin your buttercream, and you'll get those jewel-tone blues without diluting the frosting's texture.
- White gel food coloring: For tinting the foam waves and creating brightness in your design.
- Edible pearls or sugar pearls: These catch the light and give your waves a magical shimmer (completely optional but worth the investment).
Instructions
- Prepare your workspace:
- Preheat the oven to 350°F and grease your 9x13-inch pan with a light coating of butter or oil, then line it with parchment paper so the cake lifts out cleanly. Having everything ready means you won't be scrambling mid-mix.
- Combine your dry ingredients:
- Whisk together the flour, baking powder, and salt in a medium bowl, making sure everything is evenly distributed so each bite has consistent rise. This step takes less than a minute but prevents lumpy pockets in your finished cake.
- Cream the butter and sugar:
- Beat the room-temperature butter with granulated sugar for about three full minutes until the mixture transforms into something pale, fluffy, and cloud-like. You'll know it's ready when it looks almost like whipped cream and feels lighter than when you started.
- Add the eggs with patience:
- Drop one egg in at a time and let each one fully incorporate before adding the next—this keeps your batter emulsified and smooth. If it looks slightly curdled between additions, that's normal and will come together once you add the flour mixture.
- Fold in the vanilla and dry ingredients:
- Beat in the vanilla extract, then alternate adding the flour mixture and milk starting and ending with flour, mixing just until combined. Over-mixing at this point will develop too much gluten and make your cake tough instead of tender.
- Bake with confidence:
- Pour the batter into your prepared pan, smooth the top gently, and slide it into the oven for 28-32 minutes until a toothpick inserted in the center comes out clean or with just a few moist crumbs. The cake will smell buttery and rich when it's done.
- Cool completely before frosting:
- Let the cake rest in the pan for ten minutes so it firms up, then turn it out onto a wire rack and wait until it's completely cool to the touch. Frosting a warm cake will melt and slide off, so patience here is everything.
- Whip the frosting base:
- Beat room-temperature butter on medium speed for about two minutes until it's creamy and pale, then gradually add sifted powdered sugar on low speed to avoid a flour explosion. Once smooth, beat in the vanilla and milk until the frosting is light and fluffy.
- Create your color palette:
- Divide the frosting into three to four bowls and tint each batch with varying shades of blue gel coloring—from a deep ocean blue to pale aqua—plus one white portion. Use a toothpick to add color gradually so you don't overshoot and end up with navy when you wanted azure.
- Apply the crumb coat:
- Spread a thin layer of white buttercream over the entire cake to seal in crumbs, then refrigerate for twenty minutes so the base layer firms up. This step is what separates a polished look from a messy one.
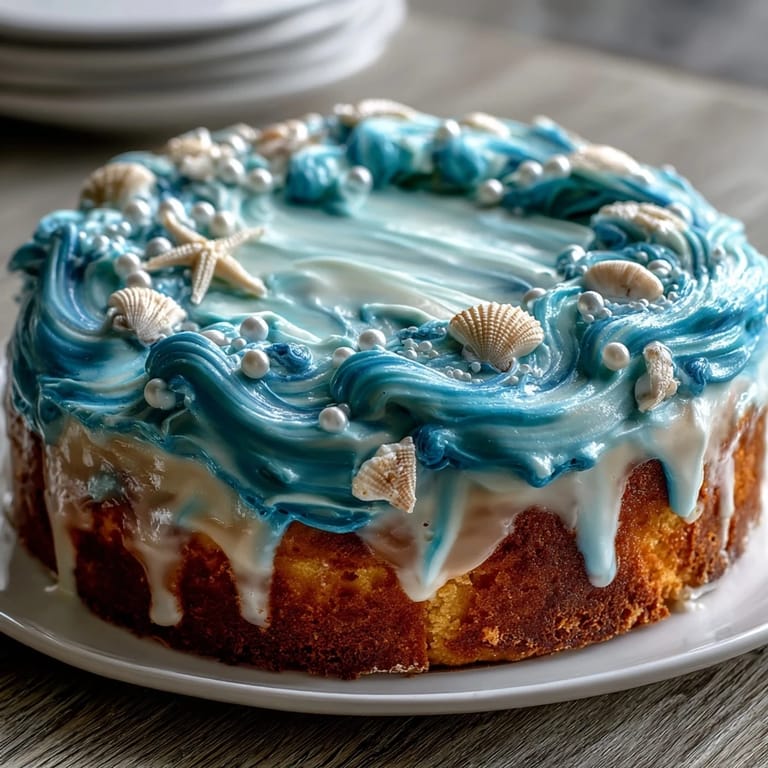
- Layer the ocean waves:
- Using an offset spatula, apply sweeping, swooping motions with your darkest blue buttercream along the bottom of the cake, then work upward with progressively lighter shades to create a natural gradient. Let each layer show through slightly instead of covering completely—this is where the magic of the ombré happens.
- Top with sea foam:
- Pipe or swirl white buttercream across the top to mimic sea foam and white-capped waves, using a round or petal piping tip if you have one. If you don't have piping bags, a fork or spatula works just fine for creating texture.
- Final touches and storage:
- Add edible pearls and an optional Pisces symbol made from white chocolate or fondant if you're feeling fancy, then refrigerate until serving. The cake actually tastes even better the next day once the flavors have settled.
 Save to Pins
 Baking this cake taught me that presentation can be part of the gift—it's saying you spent time thinking about the person's favorite things and translated that into something edible. The ocean waves aren't just pretty; they're a conversation starter that brings people together around the table.
Flavor Variations to Explore
I've experimented with adding lemon zest to the batter on warmer days, and it adds a subtle brightness that cuts through the richness without making the cake taste like lemon cake. You could also swap vanilla extract for almond extract for a slightly different personality, or infuse the milk with a touch of blue curaçao flavoring if you want the taste to match the ocean theme. The beauty of a sheet cake base is that it's forgiving enough to let you play without ruining the structure.
The Right Equipment Matters
I learned the hard way that a hand mixer and a stand mixer give different results—a stand mixer takes the guesswork out of creaming and beating, so if you have one, use it. An offset spatula is genuinely the best tool for spreading frosting smoothly, but a regular butter knife works fine if that's what you have. Piping bags with round or petal tips make the wave piping easier, but honestly, I've created beautiful waves with just a spatula and some confident swooping motions.
Storage, Serving, and Special Moments
This cake keeps beautifully in an airtight container in the refrigerator for up to four days, and it actually tastes better the next day once the crumb has set and absorbed some of the buttercream's moisture. Serve it chilled straight from the fridge so the frosting holds its shape and the waves look as intentional as you designed them. Pair it with sparkling water, a light Moscato, or even a cup of iced tea for a moment that feels both whimsical and elegant.
- Let the cake sit at room temperature for ten minutes before serving so the vanilla sponge is tender and not rock-hard cold.
- If you're transporting this cake, keep it in a cake box in the coldest part of your car to prevent the frosting from melting during the journey.
- The ombré effect looks most stunning in natural light, so timing your celebration for an afternoon gathering will make all your decorating work shine.
 Save to Pins
 This Pisces cake became something more than just dessert the moment it landed on the birthday table and everyone stopped to admire it before eating. That's the real magic of baking—not perfection, but the way it says 'I made this for you' louder than words ever could.
Frequently Asked Questions
- → What flour type works best for this cake?
All-purpose flour provides the ideal balance for a moist yet sturdy sponge that holds the frosting well.
- → How do I achieve the blue ombré effect in the frosting?
Divide the buttercream into multiple portions and tint each with varying intensities of blue gel food coloring to create a gradient from dark to light.
- → Can I substitute any ingredients for dietary needs?
For vegetarian needs this cake is suitable as is; substitutions for dairy or eggs may affect texture and require experimentation.
- → What tips help create the wave decorations?
Using petal or round piping tips with swooping motions imitates ocean waves; practice on parchment before decorating the cake.
- → How do I keep the buttercream smooth and spreadable?
Beat softened butter until creamy, gradually incorporate powdered sugar, and add milk and vanilla for a fluffy yet stable consistency.